How to Install an Induction Cooktop: What to Check First
To learn how to install an induction cooktop, first match the countertop cutout, cabinet clearances, and electrical supply to the exact model. Plan an electrician or countertop professional for wiring or surface changes.
On this page (10 sections)
- What should you check before installing an induction cooktop?
- How do you choose a built-in induction cooktop?
- Which built-in cooktops may suit your measurements?
- Does an induction cooktop need a new electrical circuit?
- What tools and preparation do you need?
- How do you fit and connect the cooktop?
- What should you check before the first use?
- What common installation mistakes should you avoid?
- How should you care for an induction cooktop after installation?
- Which installation plan should you choose?
To learn how to install an induction cooktop, first check the counter opening, electrical supply, and cabinet clearances against the exact model. A qualified electrician should handle hardwiring or circuit changes.
Choosing the right cooktop starts before you remove the old one. Measure the space, identify the power available, and decide whether your kitchen needs a 24-inch or 30-inch unit, or a model with more cooking zones.
What should you check before installing an induction cooktop?
Confirm the countertop cutout, support, cabinet clearance, and electrical requirements before you buy or fit a cooktop. Use the specific model's installation instructions and follow local requirements.
Measure the existing opening, not just the glass surface of the old cooktop. Record the width and front-to-back depth, and check whether the counter edges are square and supported.
Look beneath the counter for drawers, rails, ovens, and stored items that could block the cooktop body or airflow. Compare the available space with the clearances in the instructions.
Cooktops with the same nominal width can have different cutouts and connection requirements. Induction cooktop sizes explains common widths, but the model's own installation guide determines whether it will fit your counter.
How do you choose a built-in induction cooktop?
Choose by cutout dimensions, electrical compatibility, cooking-zone count, and the space you have, then weigh convenience features against your needs. A model that requires major counter or wiring changes may not be the right fit.
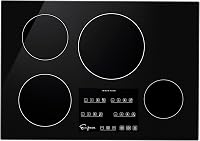
A 24-inch cooktop can suit a smaller counter or a kitchen where conserving space matters. The Empava Ease 24-Inch has four zones and touch controls; consider it if you want those features in a narrower format and its cutout and hardwired requirements work for your kitchen.
A 30-inch, four-zone cooktop suits many standard replacement plans, provided the cutout and supply match. The Empava Ease 30-Inch adds an independent timer for each zone.
The ThermoMate has four boost burners and a stated 220–240V supply, so skip either if its installation requirements don't match the space or wiring you have.
For more room to cook across several zones, the VEVOR 30-Inch has five zones and requires 240V. It may suit a kitchen where the cutout and electrical setup support that configuration; skip it if your counter opening is smaller or the supply is not appropriate.
Check magnetic cookware compatibility before you plan your first meal. Induction heats compatible cookware, so a pan that doesn't work with induction won't heat as expected.
Which built-in cooktops may suit your measurements?
The Empava Ease 30-Inch Built-In Induction Cooktop suits a 30-inch replacement plan if the cutout, clearances, and hardwired connection work for your kitchen. Its four zones, touch controls, boost mode, child lock, residual heat display, and individual timers suit cooks who want multiple built-in controls.
The ThermoMate 30-Inch 4-Burner Induction Cooktop suits a kitchen with a 28.94 x 19.5 in cutout and compatible 220–240V supply. Its independent timers, nine power levels, and boost mode suit cooks who value adjustable heat and timed zones; skip it if those installation requirements don't match.
The Empava Ease 24-Inch Built-In Induction Cooktop suits a smaller counter when a four-zone cooktop is still useful. Its overall dimensions are 23.23 x 20.47 x 2.16 in, but confirm the required cutout and hardwired connection before choosing it.
The VEVOR 30-Inch 5-Burner Induction Cooktop suits a kitchen planned around five zones, with a 29.9 x 19.7 in cutout and 240V supply. Its touch controls include nine power levels, boost, pause, and a timer; skip it if the counter or electrical setup does not match.
For more options, see 30-inch built-in induction cooktops. Compare each model's measurements and electrical requirements, not only its burner count.
Does an induction cooktop need a new electrical circuit?
Check the cooktop's voltage, connection method, and circuit requirements against your home's wiring. A built-in model may need hardwiring or a different circuit from the one used by your old appliance.
The ThermoMate requires 220–240V and comes with a 3 ft power cable. The VEVOR requires 240V.
The Empava models are described as hardwired, and an electrician should verify the circuit, breaker, wiring, and local requirements.
Don't assume an existing outlet or cable is suitable because it fits the appliance. If you need a new circuit, hardwiring, or a change to existing wiring, arrange the work with a qualified electrician.
If you're moving from gas, read how to replace a gas cooktop with induction. The gas connection needs safe disconnection, and the new appliance needs a suitable electrical supply.
What tools and preparation do you need?
Prepare the tools and parts named in the cooktop's instructions before work begins. A tape measure and screwdriver may be useful, but each installation can require different hardware and steps.
Clear the cabinet below, protect the counter, and make sure the appliance can be lifted safely. The ThermoMate includes a cutout template board, and the Empava Ease 24-Inch includes an installation kit.
Don't improvise brackets, padding, or sealants. Use the mounting parts and methods specified for the model, and keep the cooktop's cable clear of sharp edges and moving drawers.
How do you fit and connect the cooktop?
Fit the cooktop only after confirming the opening, counter support, and clearances meet its instructions. Keep the glass protected, lower the unit carefully, and secure it as directed.
Have a qualified person isolate and verify the power before removing the old appliance. If you're replacing gas, arrange professional disconnection of that connection too.
Follow the manual's sequence for gaskets, clips, brackets, or seals. Don't drag the glass across the counter or force the appliance into a tight opening.
Leave the required airflow space below and around the unit. Check the instructions for clearances above an oven or other equipment, and confirm the cooktop sits level and stable.
Electrical connection should follow the exact model requirements and local rules. If the work involves wiring, have a qualified electrician complete and check it before power is restored.
What should you check before the first use?
Start using the cooktop only after it is secure, correctly connected, and checked according to its manual. Keep the instructions nearby for startup steps and error codes.
After the electrician confirms the connection, restore power and follow the model's startup steps. Use magnetic cookware that is compatible with induction, and check that the controls and zones respond as described.
Stop if you notice a burning smell, an unexpected noise, an error message, or a tripped breaker. Switch the appliance off safely and contact the installer or manufacturer instead of repeatedly resetting the breaker.
What common installation mistakes should you avoid?
Avoid guessing about the cutout, wiring, or ventilation. A small mismatch can prevent a secure fit or leave the appliance without the required space.
Common mistakes include:
- Measuring only the old cooktop's glass instead of the counter opening.
- Assuming every 30-inch model needs the same cutout.
- Using an electrical circuit without confirming that it suits the new cooktop.
- Blocking ventilation with a drawer, shelf, or stored items.
- Cutting the counter before checking the new model's instructions.
- Connecting wires without the required qualifications.
If the appliance doesn't fit or the electrical setup is uncertain, stop and get advice before modifying the counter or wiring. Induction cooktops explained covers the main types and power considerations.
How to install an induction cooktop safely: who should do the work?
You can handle measuring and planning, but electrical work and difficult counter changes call for qualified help. A straightforward drop-in fit still needs to meet the model's instructions and local requirements.
Hire an electrician for hardwiring, a new circuit, or uncertain wiring. Use a countertop professional if the opening needs cutting or repair, and arrange qualified help to disconnect or cap a gas line.
How should you care for an induction cooktop after installation?
Keep the glass surface and ventilation area clear so the cooktop is ready for regular use. Follow the manual for cleaning and avoid dragging cookware across the glass.
Wipe spills with a damp cloth once the surface is safe to clean. Use the cooktop's residual heat indicator where available, and follow the manual's care advice before using any cleaner or tool.
For step-by-step surface care, see how to clean an induction cooktop without scratching it. For help comparing operating features, read induction cooktop features worth having.
Which installation plan should you choose?
Choose a cooktop whose cutout and electrical needs already match your kitchen if you want the simplest replacement. Plan professional electrical or countertop work before ordering if either one needs to change.
Pick the Empava Ease 24-Inch for a narrower four-zone layout, the Empava Ease 30-Inch or ThermoMate for a four-zone 30-inch plan, or the VEVOR when a five-zone layout fits your counter and 240V supply.
For any model, the practical answer to how to install an induction cooktop is to measure first, confirm the power and clearances, then follow its instructions with qualified help for wiring or gas work.
Frequently asked questions
Can I install an induction cooktop myself?
You may be able to handle measuring and fitting if the manual allows it and the opening and electrical supply match. Use a qualified electrician for hardwiring or circuit changes, and check local requirements before starting.
Don't disconnect or connect wiring unless you're qualified to do so.
Does an induction cooktop need a special outlet?
It depends on the model. Built-in cooktops may require a dedicated 220–240V circuit and may be hardwired rather than connected through an outlet.
Check the instructions and have an electrician assess the home's circuit before buying.
Don't assume an existing outlet or cable is suitable.
Do I need to cut the countertop for a built-in induction cooktop?
A built-in cooktop fits into a countertop cutout, but the opening may already exist if you're replacing another unit. Measure its width, depth, and shape, then compare them with the new model's requirements.
Don't enlarge the opening until you've confirmed clearances and support.
Can I replace a gas cooktop with induction?
Often, but the countertop opening and electrical supply both need to suit the new cooktop. A gas connection must be safely disconnected or capped by a qualified professional, and an electrician may need to install the required circuit.
See our guide to replacing a gas cooktop with induction.